> ## Documentation Index
> Fetch the complete documentation index at: https://docs.checkypro.com/llms.txt
> Use this file to discover all available pages before exploring further.
# 10. Connect Subdomain
### 10.1 Introduction
To give your customers a **fully branded checkout experience,** you can connect your own custom subdomain to Checky Pro.\
This allows your checkout to appear under your brand (for example **checkout.yourstore.com**) instead of a generic third-party URL.
Connecting your domain builds **trust, improves conversion rates**, and gives your checkout a professional look.\
You will set this up by adding a CNAME record in the DNS settings of your domain provider (**Shopify, GoDaddy**, **etc.**).
This guide includes:
* A **general explanation** of how the connection works
* A step-by-step guide for **Shopify domains**
* A step-by-step guide for **GoDaddy domains**
## 10.2 General setup overview
Before starting, make sure you have:
* Access to your domain provider’s DNS settings
* A Checky Pro account
* Decided which subdomain to use (for example checkout.yourstore.com)
**Tip: Use a simple subdomain**\
\
We recommend using a clear, short subdomain like **checkout.yourstore.com**, **pay.yourstore.com**, or **shop.yourstore.com**.\
\
Avoid complicated subdomains such **assecure-checkout** or **payment-portal**. The simpler the name, the better your customers will recognize it.
## 10.3 Create subdomain
Create a subdomain within **Checky Pro**
### 1. Add subdomain in Checky Pro
1. **Log in** to your **Checky Pro**.
2. Go to **Settings** → **Custom** **domain**.
3. Fill in the **field**.
**Tip:** Use **"Pay"** or **"Checkout"**, to avoid complicated subdomains
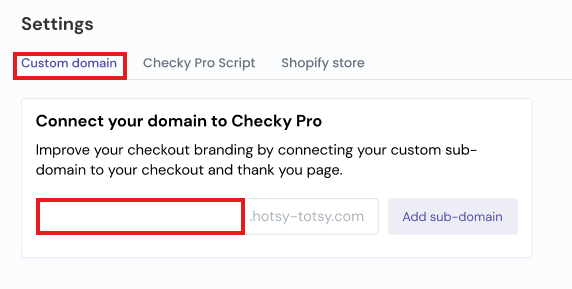 4. Click **Add sub-domain**.
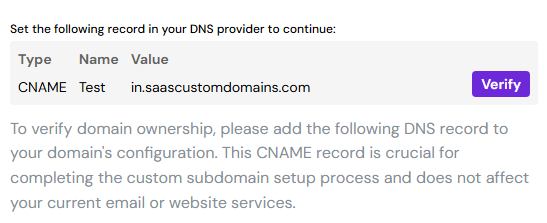
5. After clicking **Add sub-domain**, a verification screen will appear.\
This screen provides a **CNAME record** that you need to add to your DNS settings.
4. Click **Add sub-domain**.
5. After clicking **Add sub-domain**, a verification screen will appear.\
This screen provides a **CNAME record** that you need to add to your DNS settings.
 ## 10.4 Shopify Domains
If your domain is hosted on **Shopify**, follow the steps below.
### 1. Open DNS settings
1. **Log in** to your **Shopify**.
2. Go to **Settings** → **Domains**.
3. Find your **Primary active domain** and select it.
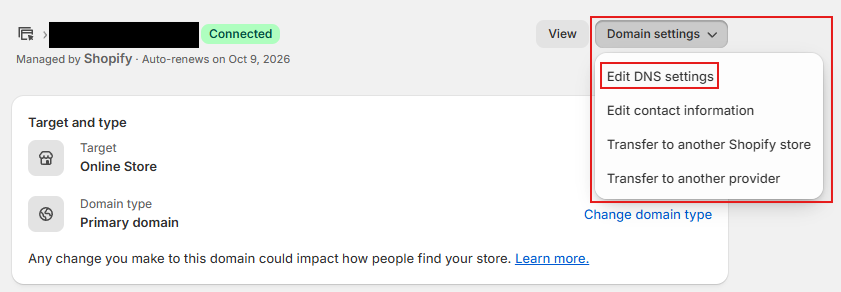
4. Click **Domain settings.**
5. Click **Edit DNS settings**
## 10.4 Shopify Domains
If your domain is hosted on **Shopify**, follow the steps below.
### 1. Open DNS settings
1. **Log in** to your **Shopify**.
2. Go to **Settings** → **Domains**.
3. Find your **Primary active domain** and select it.
4. Click **Domain settings.**
5. Click **Edit DNS settings**
 ### 2. Create a CNAME record
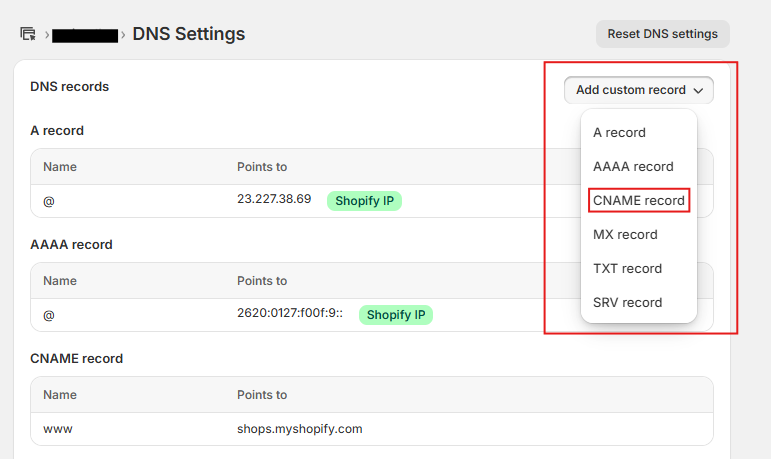
1. Click **add custom record.**
2. Click **CNAME record**.
### 2. Create a CNAME record
1. Click **add custom record.**
2. Click **CNAME record**.
 3. Add a new **CNAME record** provided in step **10.3**
**Example:**
3. Add a new **CNAME record** provided in step **10.3**
**Example:**
 4. Fill in the **fields** and click **Confirm**.
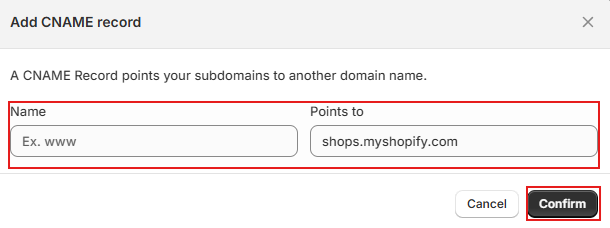 5. Now go back to your Checky Pro dashboard and click **Verify**.
**Tip:** Common mistake to avoid
Do not point your **CNAME** to your main website domain (for example, [yourstore.com](http://yourstore.com)). It must point to **in.saascustomdomains.com**, otherwise your checkout will not work.
## 10.5 GoDaddy Domains
If your domain is hosted on **GoDaddy**, follow the steps below.
### 1. Open DNS management
1. Go to [https://www.godaddy.com/](https://www.godaddy.com/) and **log in** .
2. From the top menu, click your name and choose **My products**.
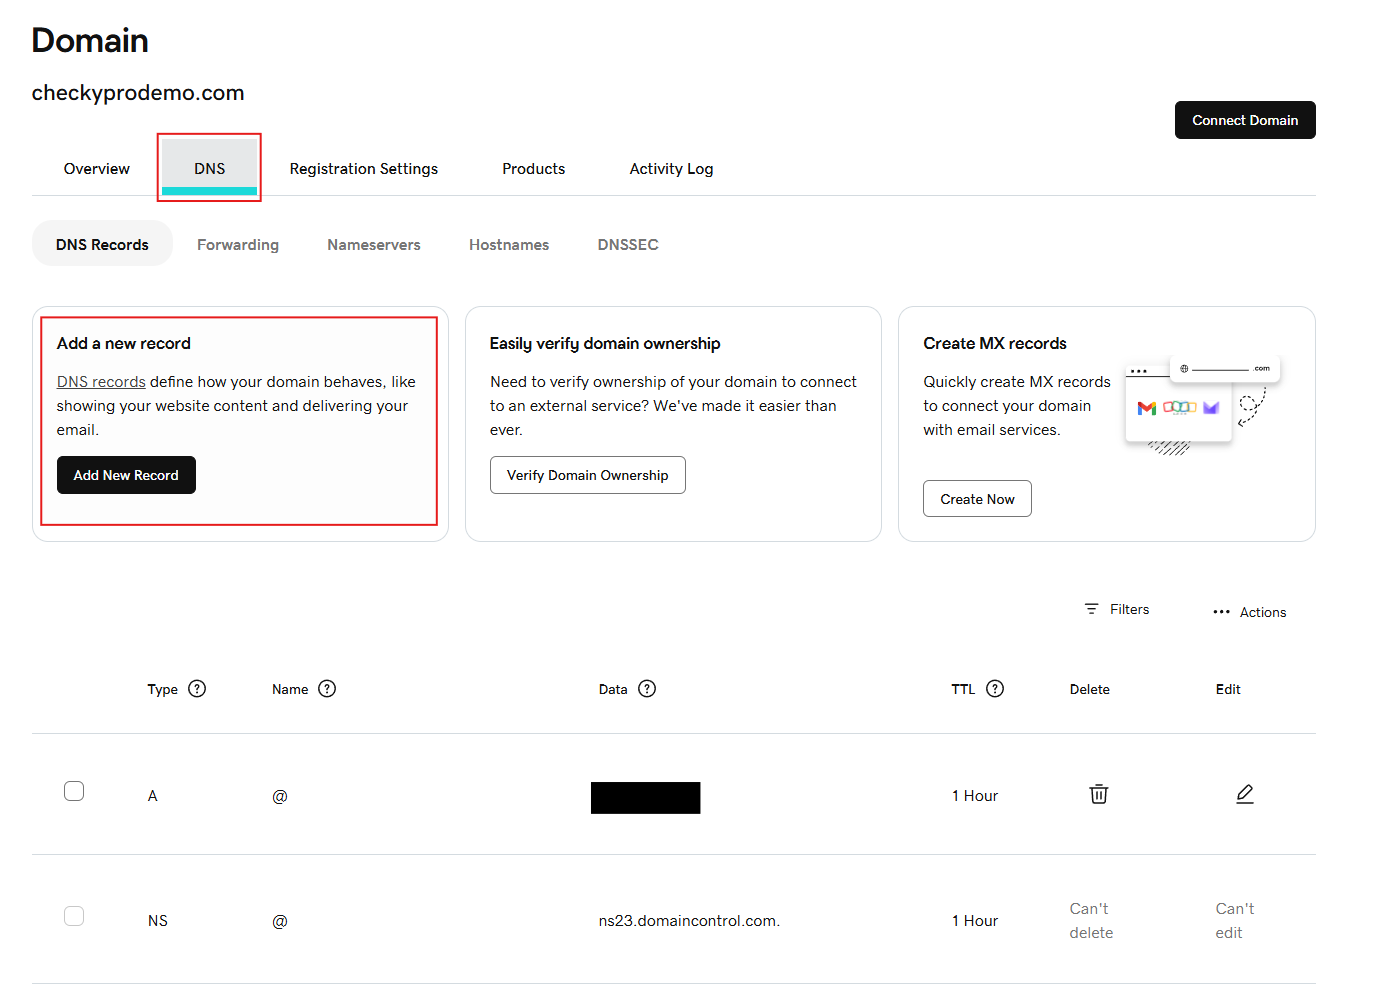
3. Under **Domains**, select your active domain and click **DNS**.
5. Now go back to your Checky Pro dashboard and click **Verify**.
**Tip:** Common mistake to avoid
Do not point your **CNAME** to your main website domain (for example, [yourstore.com](http://yourstore.com)). It must point to **in.saascustomdomains.com**, otherwise your checkout will not work.
## 10.5 GoDaddy Domains
If your domain is hosted on **GoDaddy**, follow the steps below.
### 1. Open DNS management
1. Go to [https://www.godaddy.com/](https://www.godaddy.com/) and **log in** .
2. From the top menu, click your name and choose **My products**.
3. Under **Domains**, select your active domain and click **DNS**.
 ### 2. Add a CNAME record
1. In the **DNS records** section, click **Add**.
2. Choose **CNAME** as the record type.
3. Add a new **CNAME record** provided in step **10.3** and click **Save.**
**Example:**
### 2. Add a CNAME record
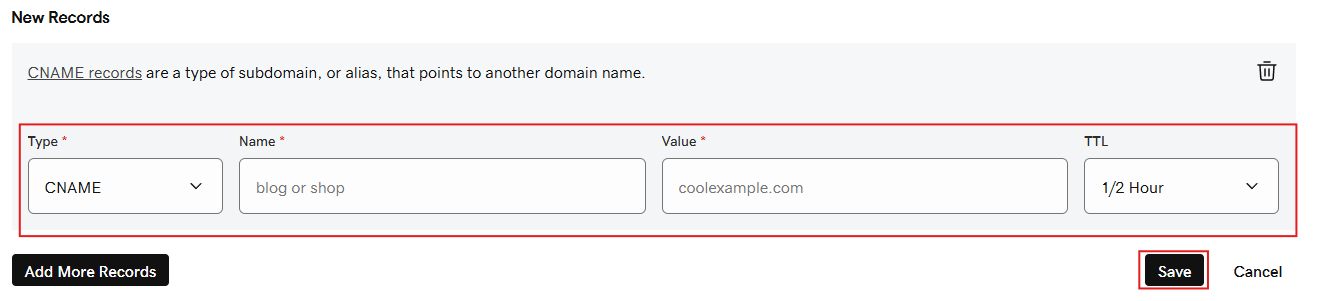
1. In the **DNS records** section, click **Add**.
2. Choose **CNAME** as the record type.
3. Add a new **CNAME record** provided in step **10.3** and click **Save.**
**Example:**
 4. Now go back to your Checky Pro dashboard and click **Verify.**
**Tip:** Keep DNS clean\
\
If you already have an old **“checkout**” record in your **DNS**, remove or replace it before adding the new **CNAME**.\
Duplicate records can cause conflicts and prevent verification.
###
## 10.6 Troubleshooting (if verification fails)
If your subdomain doesn’t verify after a few hours, check the following:
* Confirm your CNAME record points exactly to **in.saascustomdomains.com**.
* Ensure there are no **duplicate** DNS records for the same **subdomain**.
* Wait a little longer, some DNS providers take up to **24 hours** to update globally.
* Try clearing your \*\*local \*\*DNS cache or testing your domain using **dnschecker.org.**
If you still have issues, contact **Checky Pro** support with a \*\*screenshot \*\*of your DNS record for assistance.
## 10.7 Final notes
Connecting a custom subdomain allows your checkout to appear fully branded, giving customers a smooth and trustworthy payment experience.\
Make sure your DNS record is correctly formatted, saved, and verified inside your Checky Pro dashboard.\
Once connected, your checkout will automatically be live under your own domain.
4. Now go back to your Checky Pro dashboard and click **Verify.**
**Tip:** Keep DNS clean\
\
If you already have an old **“checkout**” record in your **DNS**, remove or replace it before adding the new **CNAME**.\
Duplicate records can cause conflicts and prevent verification.
###
## 10.6 Troubleshooting (if verification fails)
If your subdomain doesn’t verify after a few hours, check the following:
* Confirm your CNAME record points exactly to **in.saascustomdomains.com**.
* Ensure there are no **duplicate** DNS records for the same **subdomain**.
* Wait a little longer, some DNS providers take up to **24 hours** to update globally.
* Try clearing your \*\*local \*\*DNS cache or testing your domain using **dnschecker.org.**
If you still have issues, contact **Checky Pro** support with a \*\*screenshot \*\*of your DNS record for assistance.
## 10.7 Final notes
Connecting a custom subdomain allows your checkout to appear fully branded, giving customers a smooth and trustworthy payment experience.\
Make sure your DNS record is correctly formatted, saved, and verified inside your Checky Pro dashboard.\
Once connected, your checkout will automatically be live under your own domain.